Training Deep Models for Semantic Segmentation
With Dragonfly's Deep Learning Tool even non-experts in image processing and artificial intelligence can create robust and reproducible segmentation results by training a deep model for semantic segmentation. You simply need to label features on a training set, train the model, and then let Dragonfly do the tedious segmentation, saving you time and minimizing user bias.
The following videos provide an introduction to training deep models for semantic segmentation.
Training a deep model for segmenting fabric fibers (23:16):

(https://www.youtube.com/watch?v=1WVlskyuw94).
Training a deep model for segmenting multiple material phases (11:44):

(https://www.youtube.com/watch?v=Sl6vv51T7Mg).
The following items are required for training a deep model for semantic segmentation:
- Training dataset(s) for the input. See Extracting New Images from Marked Slices for information about extracting a training dataset as a subset of the original data.
- A target for the output(s), which must be a multi-ROI(s). For each class in the multi-ROI, voxels must be labeled in a semantically significant manner (see Labeling Multi-ROIs for Deep Learning).
- A model that supports semantic segmentation.
You should note that a selection of untrained models suitable for binary and multi-class segmentation are supplied with the Deep Learning Tool (see Generating Models for Semantic Segmentation). You can also download models from the Infinite Toolbox (see Infinite Toolbox), or import models from Keras.
The following items are optional for training a deep model for semantic segmentation:
- An ROI mask(s), for defining the working space for the model (see Applying Masks).
- A ground-truth dataset for validation. If a validation dataset is not available, you can assign a percentage of the training set for validation (see Validation Settings).
Multi-ROIs that are used as the target output for semantic segmentation must meet the following conditions:
- The multi-ROIs must have the same geometry as the input training data.
- All voxels contained within the input patches must be labeled to be considered during training. Patches that are not fully segmented will be ignored.
Note Applying a mask may limit the number of input patches that are processed (see Applying Masks).
- For each class in the multi-ROI, voxels must be labeled in a semantically significant manner.
- Whenever possible, an equivalent number of voxels should be labeled for each class.
- Training is always done on the image plane and all classes must be labeled on that plane.
As shown in the illustration below, three distinct material phases in a training dataset were labeled as separate classes. You should note that labeling can be done directly on a multi-ROI as of Dragonfly version 2020.1 (see Multi-ROI Classes and Labels). You can also choose to work on multiple regions of interest, from which you can create a multi-ROI (see Creating Multi-ROIs from Regions of Interest).
Multi-class labeling

Dragonfly's Deep Learning Tool provides a number of deep models — including U-Net, DeepLabV3+, FC-DenseNet, and others — that are suitable for binary and multi-class semantic segmentation. Semantic segmentation is the process of associating the voxels of an image with a class label.
- Choose Artificial Intelligence > Deep Learning Tool on the menu bar.
The Deep Learning Tool dialog appears.
- On the Model Overview panel, click the New button on the top-right.
The Model Generator dialog appears (see Model Generator for additional information about the dialog).
- Make sure that only Semantic Segmentation is checked for the Filter on model type options.
This will filter the available architectures to those recommended for segmentation.
- Choose the required architecture in the Architecture drop-down menu.

Note A description of each architecture is available in the Architecture Description box, along with a link for more detailed information.
Recommendation U-Net models are often the easiest to train and produce good results in many cases. For a more powerful option, you might consider Sensor3D, which uses a 3D context.
- Choose Semantic segmentation in the Model Type drop-down menu.
- Enter the required class count for the neural network in the Class Count box.

For example, if you training set multi-ROI has four classes, then you must enter a Class Count of 4.
- Choose an Input Dimension as follows:
- Choose '2D' if you want limit training to 2D, i.e. slice-by-slice.
- Choose '3D' and then a number equal to or greater than '3' to train in 3D, in which case multiple slices of the input dataset will be considered for the output target (see Configuring Multi-Slice Inputs).

- Enter a name and description for the new model, as required.
- Edit the default parameters of the selected architecture, optional.
- Click Generate.
After processing is complete, a confirmation message appears at the bottom of the dialog.
- Close the Model Generator dialog.
- Select the new model in the Model list and then click the Load button.
Information about the loaded model, as well as a graph view of the data flow, appears in the dialog (see Model Information and Graph View).
- Continue to the topic Training Models to learn how to train your new model for multi-class segmentation.
You can start training a supported model for semantic segmentation after you have prepared your training input(s) and output(s), as well as any required masks (see Prerequisites).
- Open the Deep Learning Tool, if it is not already onscreen.
To open the Deep Learning Tool, choose Artificial Intelligence > Deep Learning Tool on the menu bar.
- Do one of the following, as required:
- Generate a new model for semantic segmentation (see Generating Models for Semantic Segmentation).
- Select a model from the Model list that contains the required architecture, number of classes (for example, "Multi-class Segmentation, n=4"), inputs, and multi-slice count.
- Import a model from Keras (see Importing Models from Keras).
- Select the required model from the Model list and then click the Load button.
Information about the model appears in the Model information box (see Model Information), while the Graph view shows the data flow through the model (see Graph View).
- Edit the selected model, if required (see Model Editing Panel).
Note In most cases, you should be able to train a multi-class segmentation model supplied with the Deep Learning Tool as is, without making changes to its architecture.
- Click the Go to Training button at the bottom of the dialog.
The Model Training panel appears (see Model Training Panel).
- Do the following on the Inputs tab for each set of training data that you want to train the model with:
- Choose your training dataset in the Input drop-down menu.
Note If you chose to train your model in 3D, then additional options will appear for the input, as shown below. See Configuring Multi-Slice Inputs for information about selecting reference slices and spacing values.

Note If your model requires multiple inputs, select the additional input(s), as required (see Training with Multiple Inputs).
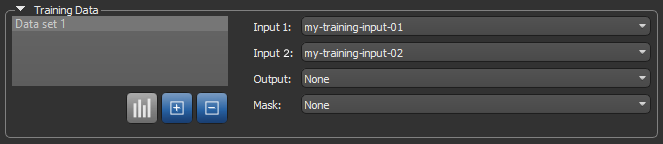
- Choose the required multi-ROI in the Output drop-down menu.
Note Only multi-ROIs with the number of classes corresponding to model's class count will be available in the menu.
- Choose a mask in the Mask drop-down menu, optional. You should note that in cases in which only a limited number of slices are labeled on the training target multi-ROI, a mask will be generated automatically to include only those slices (see Applying Masks).
The completed Training Data should look something like this:

Note If you are training with multiple training sets, click the Add New
 button and then choose the required input(s), output, and mask for the additional item(s).
- Choose your training dataset in the Input drop-down menu.
- Do the following, as required.
- Adjust the data augmentation settings (see Data Augmentation Settings).
- Adjust the validation settings (see Validation Settings).
- Click the Training Parameters tab and then choose the required settings.
See Basic Settings for information about choosing an input (patch) size, epochs number, loss function, optimization algorithm, and so on.

Note You should monitor the estimated memory ratio when you choose the training parameter settings. The ratio should not exceed 1.00 (see Estimated Memory Ratio).
- If required, check the Show Advanced Settings option and then choose the advanced training parameters (see Advanced Settings).
You should note that this step is optional and that these settings can be adjusted after you have evaluated the initial training results.
- Click the Train button.
You can monitor the progress of training on the Progress bar, as shown below.

Recommendation During training, the quantity 'val_categorical_accuracy' should increase, while 'val_loss' should decrease. You should continue to train until 'val_loss' stops decreasing. In most cases, you should increase the number of significant digits to make sure that small changes to monitored quantities can be noted (see Selecting the Views Preferences).
When training is complete or is stopped, the Training Results dialog appears.
- Evaluate the training results, recommended (see Evaluating Training Results).
You can also generate previews of the original data or test set to further evaluate the model (see Generating Previews).
- If the results are not satisfactory, you should consider doing one or more of the following and then retraining the model:
- Label additional voxels on the target output multi-ROI(s) (see Editing Classes and Labels). When adding new labels or editing labeled voxels, you should concentrate on classes that were not adequately segmented or that were identified as another class.
- Add an additional training set.
- Create a mask centered on problematic areas (see Applying Masks).
- Adjust the data augmentation settings (see Data Augmentation Settings).
- Adjust the training parameter settings (see Basic Settings and Advanced Settings).
Note If your results continue to be unsatisfactory, you might consider changing the selected model.
- When the model is trained satisfactorily, click the Save button to save your deep model.
- Process the original dataset or similar datasets in the Segment with Classifier panel, as required (see Automated Segmentation).
After training is complete or stopped, you can evaluate the results in the Training Results dialog, as well as generate previews of a test set or the original data to further evaluate the predictive model (see Generating Previews).
The Training Results dialog, shown below, appears automatically after training is complete or stopped.
Training Results dialog

You can do the following to evaluate the training results:
- Choose the metric(s) that you want to plot over the training epochs — 'categorical_accuracy', 'loss', 'val_categorical_accuracy', and/or 'val_loss'.
- Click the List tab and then view the a summary of the training, as shown below.


